Jodo Widget Integration
Jodo API Reference Guide
Jodo Widget Integration
This document explains different methods of integrating Jodo Digital Channel communications in Websites / Ecommerce sites and Mobile apps via Jodo widget API using script and steps to do the same.
What is Jodo Widget API?
Jodo widget offers Jodo LIVE Chat and Call services for any WordPress / HTML website. A Jodo widget API is built on collaborative technology, it’s a communication platform for voice, video, Screenshare and chat media based on available customer’s bandwidth and sharing data, location, documents, and images while on chat/call.
Features:
Easy to Install:
Jodo offers ready scripts for developers to use with HTML / PHP / WordPress / CMS platforms. The Jodo live chat/call button will appear at the right bottom of your website’s page upon integration of this script.
Multi-lingual:
Jodo Widget supports many Indian as well global languages and allows customers to communicate with predefined language selections. It is easy to add new languages.
Multi-device support:
Jodo Widget supports different UI form-factors like Mobile/Desktop /Full screen views options.
Sharing data while on-call: Using Jodo “Document Push” to share images, Audio, or Video files and documents while on call. You and your customers could even annotate on the same data and save it for references.
Communication Transcript:
The customer can request a transcript of the communication to be shared on email after the completion of the conversation with the business user. If the communication includes a voice call, a link to the call recording will also be embedded in the transcript mail.
Call-back Functionality:
Website visitors (customers) can request a callback in case of non-working hours or if business users are busy on another call or no agent is available. A message will be displayed on the customer’s screen in such scenarios with configurable form fields to set callback.
Reconnect Functionality:
If media connectivity fluctuates or drops during Jodo Voice or Video due to inconsistent network strength or other network issues, the reconnect feature is in-built to reconnect the communication session between the customer and the same business user.
Bandwidth fluctuation fallback mechanism:
If there is a network issue while video call or there is poor bandwidth for the video session to continue, the video session will end and the voice session will continue.
If there is a network issue while voice call or there is poor bandwidth for the voice session to continue, the voice session will end, and the chat session will continue. Users can reconnect the voice/video media after having enough bandwidth for voice/video and it is indicated by the bandwidth indicator.
Add Jodowidget in HTML website
Step1 –
In the HTML website select the page to add Jodo Widget and Paste below Snippet just before the end tag of the page:
					 <script>
        var __acstoolbar = {};
        __acstoolbar.servicekey = "Add Service Key"; <! Add the Service Key here>
        __acstoolbar.apikey = "Add API Key"; <! Add the API Key here>
        __acstoolbar.tracelevel = '1';
        __acstoolbar.language = 'english';
        __acstoolbar.target = "https://myjodo.jodoworld.com";
        __acstoolbar.visible = 'false';
        __acstoolbar.visibility = 'show';
        __acstoolbar.widgeticon = "show";
        __acstoolbar.theme = 'theme_orange2'; <! You can also use "theme_blue">
        __acstoolbar.serverpath = "https://myjodo.jodoworld.com";
        __acstoolbar.applicationpath = "https://myjodo.jodoworld.com";

        (function () {
            var joinSC = document.createElement('script');
            joinSC.type = 'text/javascript';
            joinSC.src = __acstoolbar.target + '/jodowidgetapi/js/initfunctions.js';
            joinSC.onload = validateKey;
            var joinScript = document.getElementsByTagName('script')[0];
            joinScript.parentNode.insertBefore(joinSC, joinScript);
        })();

        function validateKey() {
            var jodoInit = new jodoworld.initfunctions();
            jodoInit.initService();
        }
    </script>
Step2 –
Insert your API key and Service Key provided in Line #4 & #5
Step3
– Verify widget has loaded on your target page.
Note :
Following URL will be change as per deployment of ‘Jodowidget’
__acstoolbar.target = “https://myjodo.jodoworld.com/“;
Add Jodo Widget in an IFRAME
Step1 –
Identify widget space in your website layout, preferably a right sidebar
Step2 –
Link the iframe source to – https://myjodo.jodoworld.com/jodowidgetapi/customerwidget.jsp where the widget will appear.
Step3 –
Add the below script inside your website’stag, preferably just before closing of the tag
<script type="text/javascript"src="https://myjodo.jodoworld.com/jodowidgetapi/js/initfunctions.js"></script>
Step4 –
Add the following script just before the end of body tag
					<script>
    var jodoInit;
    var responsedata;
    var __acstoolbar = {};

    __acstoolbar.theme = "theme5";
    __acstoolbar.tracelevel = "1";
    __acstoolbar.language = "english";
    __acstoolbar.target = "https://myjodo.jodoworld.com/";
    __acstoolbar.apikey = "<INSERT_YOUR_API_KEY>";
    __acstoolbar.servicekey = "<INSERT_YOUR_SERVICE_KEY>";
    __acstoolbar.visibility = "hide";
    __acstoolbar.widgeticon = "hide";

    function validateKey() {
        jodoInit = new jodoworld.initfunctions();
        jodoInit.initService();
    }
</script>
Iframe communication : Send Message
					<script>
//send message to child frame called from  initfunctions.js no need to include the iframe communication script separately
iframeObj = document.getElementById("widgetIframe");
var sendMsg = function (msg) {
    iframeObj.contentWindow.postMessage(msg, '*');
};
//listen to msg from child window.
bindEvent(window, 'message', function (e) {
//    console.log("iframe message from child:" + e.data);
    handleIframeMessagesFromChild(e.data);
});
        </script>
Iframe Communication : Listener Function :
					//send message to child frame called from  initfunctions.js no need to include the iframe communication script separately
function handleIframeMessagesFromChild(data) {
    var childMsg = JSON.parse(data);
    var status = childMsg.id;
    var message = childMsg.message;
    switch (status) {
        case "done":
            var mainreponse = reponsedata;
            var obj = {id: "mainresponse", message: mainreponse};
            sendMsg(JSON.stringify(obj));
            break;
        case "end":
            var jodoInit = new jodoworld.initfunctions();
            jodoInit.initService();
            var mainreponse = reponsedata;
            var obj = {id: "reload_mainresponse", message: mainreponse};
            sendMsg(JSON.stringify(obj));
            setTimeout(function () {
                closeall = 0;
                location.reload(true);
            }, 2000);
            break;
        case "agentdata":
        setAgentDataOnNotification(message);
            break;
        case "chatmsg":
            increamentChatNotificationCounter(message);
            break;
        case "UaRegistered":
            try {
                jodoWidgetInitialized();
            } catch (e) {
                console.log("jodoWidgetInitialized() : " + e);
            }
            break;
        default:

    }
}
Step5
Call the validate function from the page where you want to use the widget
Note :
Following URL will be change as per deployment of ‘jodowidget’
__acstoolbar.target = “https://myjodo.jodoworld.com”;setAgentDataOnNotification(message);
					break;
        case "chatmsg":
            increamentChatNotificationCounter(message);
            break;
        case "UaRegistered":
            try {
                jodoWidgetInitialized();
            } catch (e) {
                console.log("jodoWidgetInitialized() : " + e);
            }
            break;
        default:

    }
}
#3 How to add jodowidget in WordPress (Woo-Commerce) ?
Step1 – Paste below Snippet just before end of body tag at wordpress page:
		//Close Widget after Jodo Session (Call/Chat/Video)
			function closeWidget(){
				document.getElementsByTagName('body')[0].style.width="100%";
				document.getElementsByClassName('nav-wrapper')[0].style.width="100%";
				jQuery('.container').removeClass('w-70');
				document.getElementsByClassName('widget_close_icon')[0].click();
				document.getElementsByClassName('widget_chat_icon').style.display="none";
			}

		//Save Customer Session Data (Product Info & Customer Details)
			function saveJodoCustomerData (productobject){
				var calldata = [];
				var calldataelement = {};
				if (jodoinitdone === true) {
					calldataelement = new Object();
					calldataelement.parameterid = 4031;
					calldataelement.value = productobject.getAttribute("data-product_name");
					calldata.push(calldataelement);
					calldataelement = new Object();
					calldataelement.parameterid = 4034;
					calldataelement.value = productobject.getAttribute("data-product_price");
					calldata.push(calldataelement);
					calldataelement = new Object();
					calldataelement.parameterid = 4033;
					calldataelement.value = productobject.getAttribute("data-product_id");
					calldata.push(calldataelement);
					calldataelement = new Object();
					calldataelement.parameterid = 4035;
					calldataelement.value = productobject.getAttribute("data-product_categories");
					calldata.push(calldataelement);
					calldataelement.parameterid = 4041;
					calldataelement.value = productobject.getAttribute("data-email");
					calldata.push(calldataelement);
					jodoInit.SaveCustomerSessionData(calldata);
				  }
			}

		//Push Customer Session Language & Set Jodo language
		function SetJodoLanguage (objLang) {
			var calldata = [];
			var calldataelement = {};
			var languge = objLang;
			var selectlang;
            switch(language){
				case "en|en":	selectlang = "English";break;
				case "en|hi":	selectlang = "Hindi";break;
				case "en|mr":	selectlang = "Marathi";break;
				case "en|ar":	selectlang = "Arabic";break;
				case "en|zh-TW":selectlang = "Chinese";break;
				case "en|es":	selectlang = "Spanish";break;
				case "en|fr":	selectlang = "French";break;
				default:		selectlang = "English";break;
			}
		    jodoInit.setLanguage(selectlang);
			calldataelement = new Object();
			calldataelement.parameterid = 4011;
			calldataelement.value = selectlang;
			calldata.push(calldataelement);
			jodoInit.SaveCustomerSessionData(calldata);
		}

		//Push Webpage, Customer Data & Start Chat
			function onJodoChatClicked (productobject) {
				saveJodoCustomerData(productobject);
				jodoInit.showwidgetfromscript();
				jodoInit.showwidget_Chatfromscript();
				waitForElementThenCallById('widget_main_div',openWidget);
			}

		//Push Webpage, Customer Data & Start Jodo Call
			function onJodoCallClicked (productobject) {
 				saveJodoCustomerData(productobject);
				jodoInit.showwidgetfromscript();
				jodoInit.showwidget_Voicefromscript();
				waitForElementThenCallById('widget_main_div',openWidget);
			}

	    //Push Webpage, Customer Data & Start Video Call
			function onJodoVideoClicked (productobject) {
				saveJodoCustomerData(productobject);
				jodoInit.showwidgetfromscript();
				jodoInit.showwidget_Videofromscript();
				waitForElementThenCallById('widget_main_div',openWidget);
			}

		//show button after UA registered
		function waitForJodoInitDone() {
			if (jodoinitdone) {
				jQuery('.jodo-buttons-hide').removeClass('jodo-buttons-hide');
			} else {
				setTimeout(function() {
					waitForJodoInitDone();
				}, 1000);
			}
		}
		waitForJodoInitDone();

		//Function to synchronize event & their function calls
			function waitForElementThenCallById(id, callback) {
				if (jQuery('#'+id).length != 0) {
					callback();
				} else {
					setTimeout(function() {
						waitForElementThenCallById(jQuery("#" + id).is(":visible"), callback);
					}, 1000);
				}
			};

	</script>
Step2 – Insert your apikey and servicekey provided on Line #4 & #5
Step3 – Check to see if the widget has loaded on your homepage
Step4 – To enable jodo button for products you will need to override a file from woocomerce plugin as follows
we will place jodo buttons just below the product price hence, we will override price.php
a) Using FTP open your plugins folder
b) Copy the file price.php at wp-content/plugins/woocommerce/templates/loop/price.php
a) Open you theme folder at wp-content/themes
b) Create a folder name woocommerce
c) Inside this folder create another folder named templates
d) Inside this folder create another folder named loop
e) Inside this folder paste the file price.php
Step5 – This file will now override the woocomerce price.php and we can safely add Jodo Buttons here,
the following snippet can be used as a reference to add Jodo buttons into this file,
you may replace the file contents with the code below and add styling to your liking
					if ( ! defined( 'ABSPATH' ) ) {
		exit; // Exit if accessed directly
	}
	global $product;
	?>
	<?php $current_user = wp_get_current_user(); $user_email = $current_user->user_email;
	if ( $price_html = $product->get_price_html() ) : ?>
		<span class="price"><?php echo $price_html; ?></span>
		<div >
		<a class=" btn btn-default quick-view ion-android-call jodo-buttons-hide" data-toggle="tooltip" title="Click to Jodo Call" href="#" onclick="onJodoCallClicked(this)" data-product_name="<?php echo esc_attr__($product->get_name());?>" data-product_price="<?php echo esc_attr__($product->get_price());?>" data-product_id="<?php echo esc_attr($product->get_id()); ?>" data-product_categories="<?php echo esc_attr__(wp_strip_all_tags(wc_get_product_category_list($product->get_id()))) ?>"  data-user_id="<?php echo $user_email;?>"></a>

		<a class=" btn btn-default quick-view ion-ios-videocam jodo-buttons-hide" data-toggle="tooltip" title="Click to Jodo Video Call" href="#" onclick="onJodoVideoClicked(this)" data-product_name="<?php echo esc_attr__($product->get_name());?>" data-product_price="<?php echo esc_attr__($product->get_price());?>" data-product_id="<?php echo esc_attr($product->get_id()); ?>" data-product_categories="<?php echo esc_attr__(wp_strip_all_tags(wc_get_product_category_list($product->get_id()))) ?>"  data-user_id="<?php echo $user_email;?>"></a>

		<a class=" btn btn-default quick-view ion-android-chat jodo-buttons-hide" data-toggle="tooltip" title="Click to Jodo Chat" href="#" onclick="onJodoChatClicked(this)" data-product_name="<?php echo esc_attr__($product->get_name());?>" data-product_price="<?php echo esc_attr__($product->get_price());?>" data-product_id="<?php echo esc_attr($product->get_id()); ?>" data-product_categories="<?php echo esc_attr__(wp_strip_all_tags(wc_get_product_category_list($product->get_id()))) ?>"  data-user_id="<?php echo $user_email;?>"></a>
	</div>
	<?php endif; ?>
Step6 – Check if Jodo buttons are visible below product price,
Jodo Buttons will load once the widget is loaded in the background.
Note :
Following URL will be change as per deployment of ‘jodowidget’
__acstoolbar.target = “https://myjodo.jodoworld.com”;
Are there any extra methods to push website data to Jodowidget while initiating session from simple Javascript ?
- Push parameters while initiating session from HTML page:
					<div class="title">JCall</div>
               <i class="j-btn fa fa-phone" onclick="jodoCall(['english','vikrant','business'])"></i>
              </div>
Sample Javascript Code Function to Pass array of parameters :
					function jodoCall(productobject) {
var calldata = [];
var calldataelement = {};
if (jodoinitdone === true) {
	jodoInit.setLanguage(productobject[0]);
	calldataelement = new Object();
	calldataelement.parameterid = 4011;
	calldataelement.value = productobject[0];
	calldata.push(calldataelement);
	calldataelement = new Object();
	calldataelement.parameterid = 4031;
	calldataelement.value = productobject[1];
	calldata.push(calldataelement);
	calldataelement = new Object();
	calldataelement.parameterid = 4035;
	calldataelement.value = productobject[2];
	calldata.push(calldataelement);
	jodoInit.SaveCustomerSessionData(calldata);
	jodoInit.showwidgetfromscript();
	jodoInit.showwidget_Voicefromscript();
        }
}
- Sample methods to push data to jodowidget from javascript function:
jodoInit.SaveCustomerSessionData(calldata);
- Sample method to display widget on screen:
jodoInit.showwidgetfromscript();
- Sample method to call jodowidget’s Voice call functionality:
jodoInit.showwidget_Voicefromscript();
- Sample method to call jodowidget’s Video call functionality:
jodoInit.showwidget_Videofromscript();
- Sample method to call jodowidget’s chat call functionality:
jodoInit.showwidget_Chatfromscript();
# What are the Script Parameters / Terminology ?
Jodo widget API script parameters while configuration with website :
| Parameter | Default Value | Details |
|---|---|---|
| apikey | API key for process | Organization unique identifier for configured service |
| servicekey | Service key for Process | Process unique identifier for configured service |
| tracelevel | 1 | Console logging tracelevel 1- 5 |
| language | English | Widget / page default language parameter |
| product | none | Widget / page default product parameter |
| functionparam | none | Widget / page default function parameter |
| theme | theme_orange | Theme parameter for UI experiance change 1. theme_orange (Orange Theme : Default Theme) 2. theme_blue1 (Blue Theme) |
| visible | true | Widget icon visibility parameters |
| visibility | hide | Widget appearance on loadtime parameter hide / show |
| target | https://myjodo.jodoworld.com/ | Hosted URL of widget API path |
Integrate JodoChat with ChatBOT
This approach keep entire control of conversation within 3rd party Chat BOT. Jodo Chat APIs are called to initialize Jodo Live Session and listen to Jodo events / messages.
3rd Party Chat BOT developer has to initialize Jodo event handler to receive events from Jodo Chat server. All Jodo chat messages need to be rendered in 3rd Party Chat BOT messages box. Additional controls have to be created in 3rd Party Chat BOT to handle Jodo voice, video, screen share etc features.
Advantages
- Retain full control of conversation within the 3rd party Chat Bot
- Control can be returned from Jodo to Chat BOT
- Developer has full control on rendering of messages in Customer view of Messages Box
- Once session is terminated, Jodo can provide additional details such as Voice Call Recording Link, Chat Transcript, Agent Details, Live Session Duration
Disadvantages
- Chat Bot window is replaced and this impacts branding of Chat Bot
- Additional efforts are required to implement features like Voice Call, Video Call, Screen Share, Location Share, File Upload
- Developer needs to know multiple Jodo Chat APIs & Events handling methods
APIs
- InitializeJodoChat
- SaveCustomerSessionData
- SendMssage
- EndChat
- Send File (Image, Video, Document etc)
- Send Location (incoming)
- Start Voice Call (Incoming)
- End Voice Call (Incoming)
- Mute voice (Incoming)
- Unmute voice (Incoming)
- Capture Image Request (Incoming)
- Start Video Call (Incoming)
- End Video Call (Incoming)
- Start Screen Share (Incoming)
- End Screen Share (Incoming)
Initialize Jodo Chat
This method should be called to initialize Jodo Chat. ChatBOT data can be passed in this method, which will be presented to user handling chat.
Calling Method : jodoInitBOT.jodosessioninit(external BOT data);
inputObject Parameters
chatbotsessionid : This is Chat BOT session id
language: Language to be used to start Live Chat
visitordetails: Visitor information
chatbot: Chat BOT communication history with all selected options, which will be presented to Jodo User
customcss: This is path to custom CSS. This CSS will be used to override Jodo Chat CSS
Input Parameters:
extbotdata : external chat bot data if available
var extbotdata =
{
    "name": "RIA",
    "conversation": [
        {
            "type": "chatbot",
            "message": "Hi",
            "timestamp": "10-jan-2023 10:00:00"
        },
        {
            "type": "chatbot",
            "message": "Choose Language ? English, Hindi",
            "timestamp": "10-jan-2023 10:00:01"
        },
        {
            "type": "visitor",
            "message": "English",
            "timestamp": "10-jan-2023 10:00:05"
        }
    ]
}
Received data parameters:
Media : session data
eventtype : initialized with session
msg : connected user name with message
Sample Response:
{
    "media": "session",
    "eventtype": "initialized",
    "msg": "Session Connected with :Cocouser"
}
Send Message
This method is used to send messages to Jodo user
Calling method:
jodoInitBOT.SendchatMessage(‘Text Data / URL’)
| Type ID | Table Header |
|---|---|
|
1 |
Text |
|
4 |
Media |
|
9 |
Location |
Parameters:
Message Type: Text / URL,
1. With URL:
jodoInitBOT. SendchatMessage (‘https://Avhan.com’);
2. Without URL:
jodoInitBOT. SendchatMessage (‘Good Morning’);
Response Data:
eventcallback (msg)
msg: Text or ULR type of data to render as text or Meta information if URL is received.
party_name : Connected Agent Name
party_image: Connected Agent Image
media : communication media
eventtype : performed event type : messagesent / message received
msgChatid: unique chat message id
msgTypeid : received message typeid
Sample response:
{
    "msg": "https://avhan.com",
    "datetime": "13:12",
    "party_name": "Satej Agale",
    "party_image": "https://jodostaging.avhan.com:4443/upload/UserImage/satej_profile_image_4357.jpg",
    "msgChatid": 64645,
    "msgTypeid": "1",
    "media": "chat",
    "eventtype": "messagereceived"
}
Sample message received from agent :
{
    "msg": "hi\n",
    "datetime": "17:38",
    "party_name": "Jhon Deo",
    "party_image": "https://jodostaging.avhan.com:4443/upload/UserImage/aishwarya_23107.jpg",
    "msgChatid": 2497,
    "msgTypeid": "1",
    "media": "chat",
    "eventtype": "messagereceived"
}
End Chat Session
This method is used to end active chat session
Calling method: jodoInitBOT.EndSession();
Input Parameters: None
Received data parameters:
Media : session data
event type : initialized with session
msg : connected user name with message
Sample Response :
{

 "media":"session",
 "eventtype":"ended",
 "msg":"Session Ended"

}
Send File
This method is used to share Image, Video, Document etc with Jodo user
SendDocument(filename, filetype, filedata)
| Type ID | Table Header |
|---|---|
|
1 |
Text |
|
4 |
Media |
|
9 |
Location |
Input Parameters:
Filename : Name of file to upload
Filetype : Type of supported file formats
Data : MIME document data and file converted into base64data
Message Type Supported: Text , URL
Sample data
File Info :
• MIME type: text/plain
• Extension: txt
• Size: 17 B
• File Name: newfile.txt
Response Data:
eventcallback (downloadURL,fileName,filetype,
recfilesize)
Received data parameters:
downloadURL : https URL for uploaded file
fileName : Name of file
filetype : File extension
recfilesize : File size in bytes
Sample Response : Document Received :
{
    "media": "documentpush",
    "eventtype": "received",
    "downloadUrl": "https://jodostaging.avhan.com:4443/upload/wall_20230909_142144.jpg",
    "fileName": "wall_20230909_142144",
    "filetype": "jpg",
    "recfilesize": 781372
}
Sample Response : Document Sent :
{
    "media": "documentpush",
    "eventtype": "sent",
    "downloadUrl": "https://jodostaging.avhan.com:4443/upload/wall_20230909_142144.jpg",
    "fileName": "wall_20230909_142144",
    "filetype": "jpg",
    "recfilesize": 781372
}
Send Location
This method is used to share location with Jodo user
SendLocation(data)
inputObject Parameters
latitude: Latitude of Location
longitude: Longitude of Location
| Type ID | Table Header |
|---|---|
|
1 |
Text |
|
4 |
Media |
|
9 |
Location |
Input Object :
{
    "shortaddress": "Malan Mansion, Matkar Marg",
    "locationLink": "https://maps.google.com/?q=19.0156,
    72.8352&ll=19.0156,72.8352&z=16",
    "staticimagelink": "https://maps.googleapis.com/maps/api/staticmap?center=19.0156,
    72.8352&size=260x180&zoom=16&maptype=roadmap&markers=color:red|19.0156,
    72.8352&key=AIzaSyD-2sMrHeOJFnrfhwAilwdclc_ESutxjP4",
    "vTime": "17:57"
}
Success Response
{
    "responsedatetime": "2024-07-25 18:03:02",
    "customersessionid": "24072517573800022381",
    "chatid": 3085813,
    "acssessionid": "1c8de8a70c71fd50412f1dabdf2fa7b149fc18161d446806b3babb0edeba",
    "chat_sesionid": "240725175632663009",
    "messages": [
        {
            "image": "https://maps.googleapis.com/maps/api/staticmap?center=19.0156,
            72.8352&size=260x180&zoom=16&maptype=roadmap&markers=color:red%7C19.0156,
            72.8352&key=AIzaSyD-2sMrHeOJFnrfhwAilwdclc_ESutxjP4",
            "latitude": "19.0156",
            "typeid": 9,
            "longitude": "72.8352"
        }
    ],
    "fromtype": 1,
    "from_image": "",
    "from_name": "Customer",
    "fromid": "",
    "command": 1721
}
Steps for WordPress Widget Configuration
Plugin Configuration Steps:
Assuming the WordPress website is already configured and Admin credentials are available with the user. Following are the steps to configure the Jodo Widget Plugin with the WordPress website.
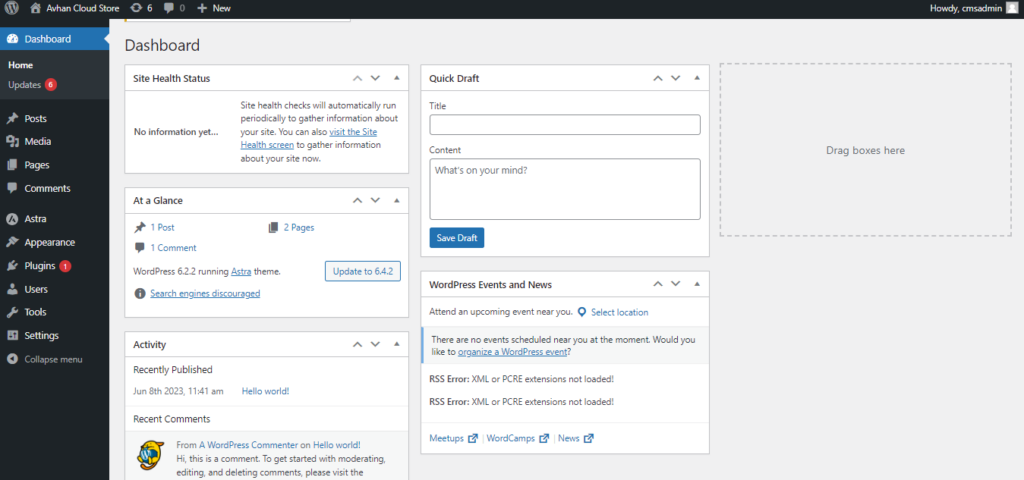
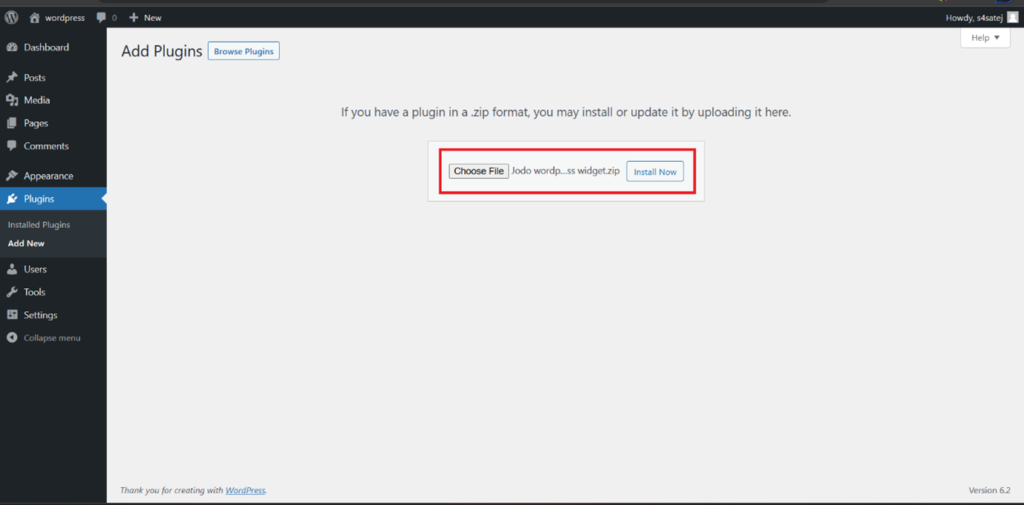
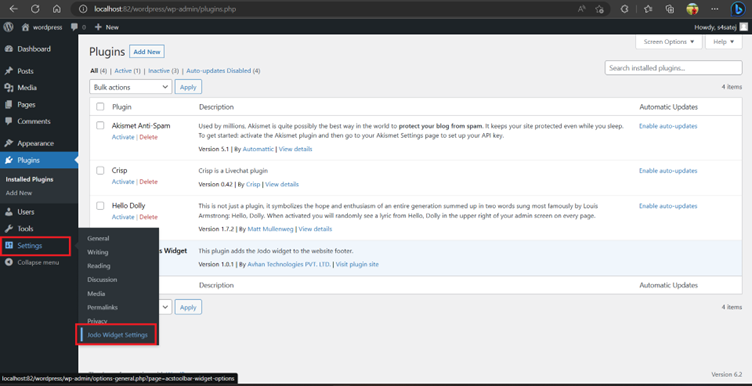
1. Open WordPress Admin Control Panel:
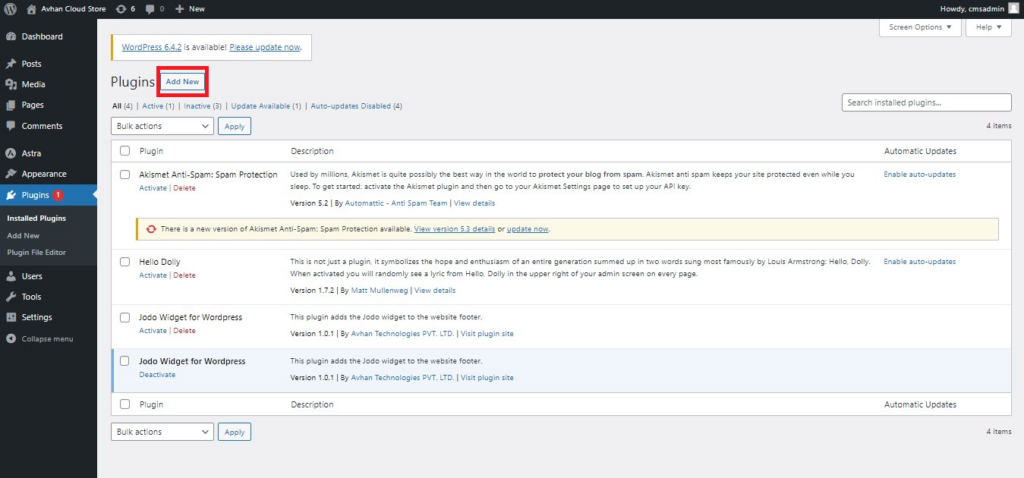
2. Navigate to the Plugins section: and Select the ‘Add New’ Option:
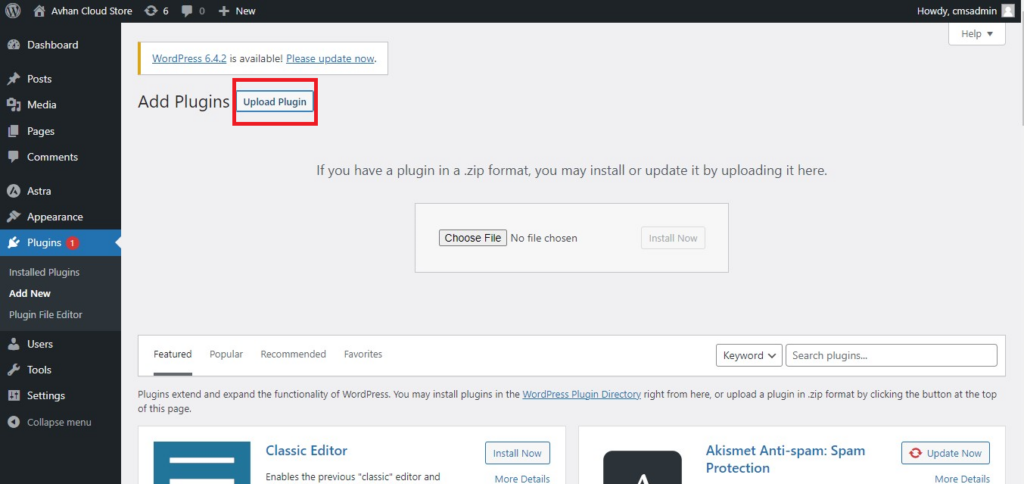
3. Select option: Upload plugin:
4. Select the plugin from the local folder and install the plugin :
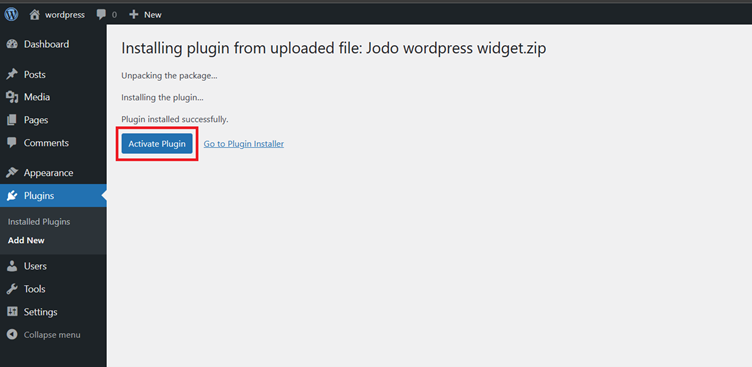
5. Activate the plugin from the plugins screen:
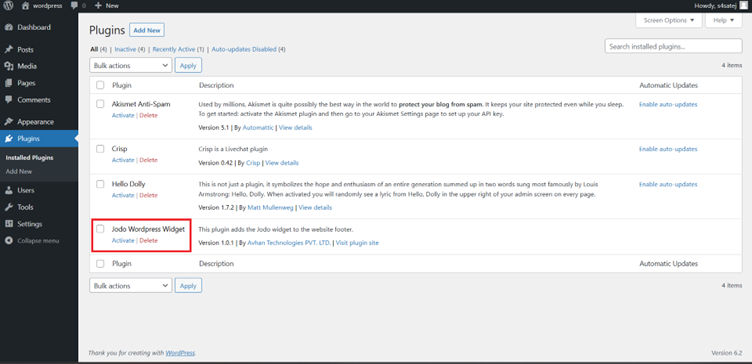
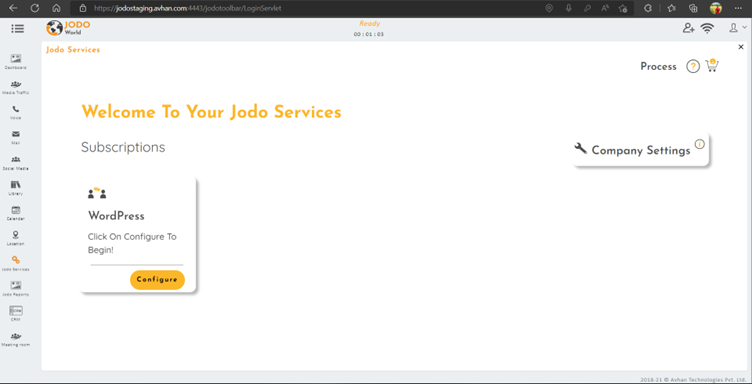
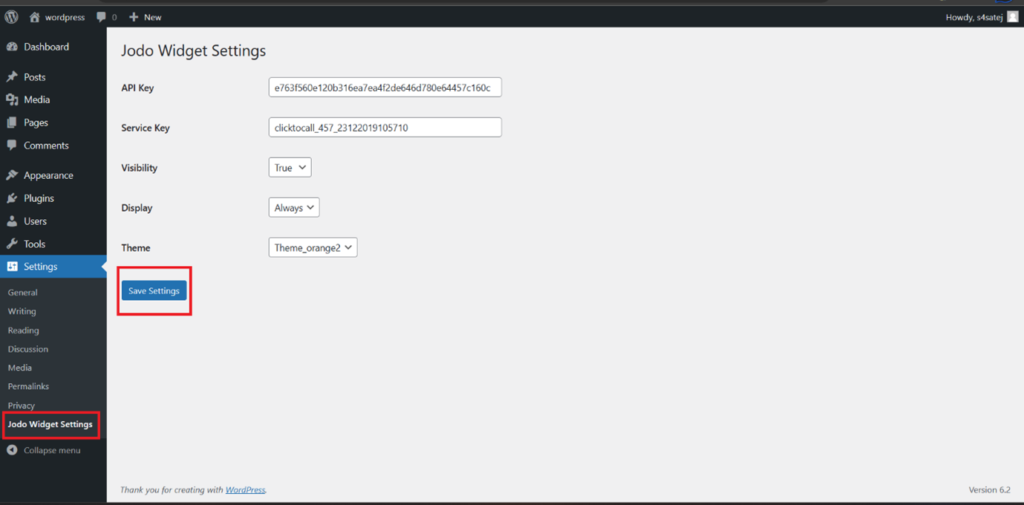
6. After activation enter valid “API Key” and “Service Key” configured for the domain using Service UI WordPress process configuration screen to start using the widget on the website.
Select: Configure > WordPress Settings >
7. Input a valid Domain Name and copy the API Key and Service Key from the page.
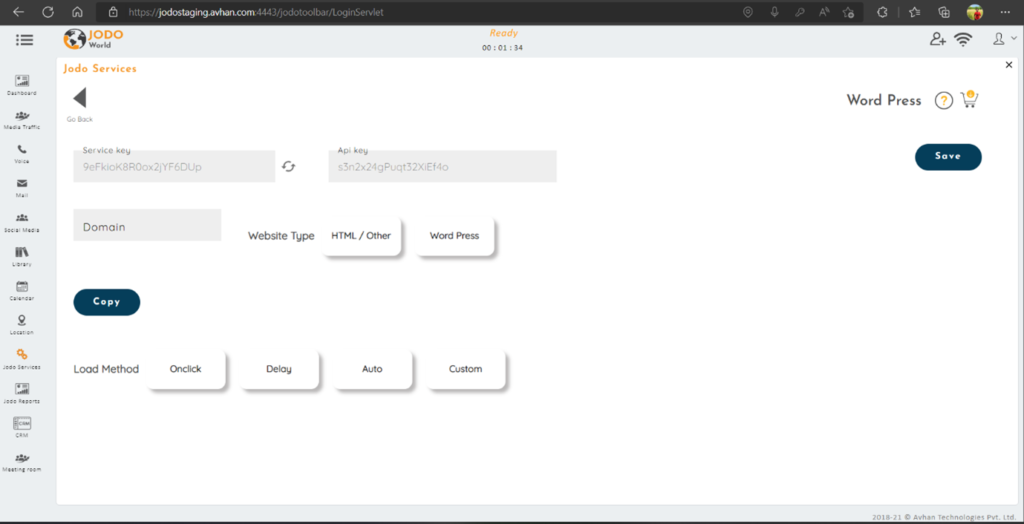
8. Configure plugin credentials and save the setting :
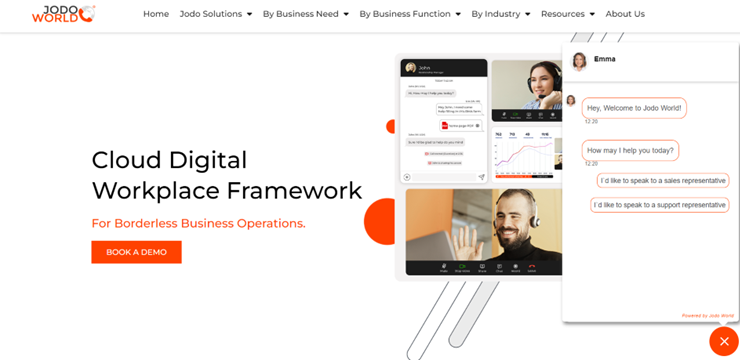
9. Check the website with the widget:
Script to pass the website Product Parameters (Woo Commerce Specific): Sample Script:
					<script>
    var jodoinitdone = false;
    var __acstoolbar = { };
    __acstoolbar.apikey = 'test_org';
    __acstoolbar.servicekey = 'E-commerce';
    __acstoolbar.tracelevel = '1';
    __acstoolbar.language = 'english';
    __acstoolbar.target = "https://myjodo.jodoworld.com/";
    __acstoolbar.visibility = "hide";
    __acstoolbar.theme="theme_orange2";
    __acstoolbar.serverpath = "https://myjodo.jodoworld.com/";
    __acstoolbar.applicationpath = "https://myjodo.jodoworld.com/";

    (function ()
    {
    var joinSC = document.createElement('script');
    joinSC.type = 'text/javascript';
    joinSC.src = __acstoolbar.target + '/jodowidgetapi/js/initfunctions.js';
    joinSC.onload = validateKey;
    var joinScript = document.getElementsByTagName('script')[0];
    joinScript.parentNode.insertBefore(joinSC, joinScript);
            })();
    function validateKey() {
        jodoInit = new jodoworld.initfunctions();
    jodoInit.initService();
            }

    function onJodoCallClicked (productobject) {
            var calldata = [];
    var calldataelement = { };
    if (jodoinitdone === true) {
        calldataelement = new Object();
    calldataelement.parameterid = 4030;
    calldataelement.value = productobject.getAttribute("data-product_url");
    calldata.push(calldataelement);

    calldataelement = new Object();
    calldataelement.parameterid = 4031;
    calldataelement.value = productobject.getAttribute("data-product_name");
    calldata.push(calldataelement);

    calldataelement = new Object();
    calldataelement.parameterid = 4034;
    calldataelement.value = productobject.getAttribute("data-product_price");
    calldata.push(calldataelement);

    calldataelement = new Object();
    calldataelement.parameterid = 4033;
    calldataelement.value = productobject.getAttribute("data-product_id");
    calldata.push(calldataelement);

    calldataelement = new Object();
    calldataelement.parameterid = 4035;
    calldataelement.value = productobject.getAttribute("data-product_categories");
    calldata.push(calldataelement);

    calldataelement = new Object();
    calldataelement.parameterid = 4041;
    calldataelement.value = productobject.getAttribute("data-email");
    calldata.push(calldataelement);

    jodoInit.SaveCustomerSessionData(calldata);
    jodoInit.showwidgetfromscript();
    jodoInit.showwidget_Voicefromscript();
            }
    resizeDownForJodo();//15-May-2019
        }
    function SetJodoLanguage (objLang) {
            var calldata = [];
    var calldataelement = { };
    console.log("WooLanguage: " + objLang);
    var languge = objLang;
    var selectlang;
    if(languge === "en|en"){     //english
        selectlang = "English" ;
            } else if(languge === "en|hi"){    //hindi
        selectlang = "Hindi" ;
            } else if(languge === "en|mr"){      //marathi
        selectlang = "Marathi";
            } else if(languge === "en|ar"){    //arabic
        selectlang = "Arabic" ;
            } else if(languge === "en|zh-TW"){     // chinese
        selectlang = "Chinese";
            } else if(languge === "en|es"){    //spanish
        selectlang = "Spanish";
            } else if(languge === "en|fr"){     //french
        selectlang = "French";
            }
    jodoInit.setLanguage(selectlang);
    calldataelement = new Object();
    calldataelement.parameterid = 4011;
    calldataelement.value = selectlang;
    calldata.push(calldataelement);
    jodoInit.SaveCustomerSessionData(calldata);
        }

    function onJodoChatClicked (productobject) {
            var calldata = [];
    var calldataelement = { };
    if (jodoinitdone === true) {
        calldataelement = new Object();
    calldataelement.parameterid = 4030;
    calldataelement.value = productobject.getAttribute("data-product_url");
    calldata.push(calldataelement);

    calldataelement = new Object();
    calldataelement.parameterid = 4031;
    calldataelement.value = productobject.getAttribute("data-product_name");
    calldata.push(calldataelement);
    calldataelement = new Object();
    calldataelement.parameterid = 4034;
    calldataelement.value = productobject.getAttribute("data-product_price");
    calldata.push(calldataelement);
    calldataelement = new Object();
    calldataelement.parameterid = 4033;
    calldataelement.value = productobject.getAttribute("data-product_id");
    calldata.push(calldataelement);
    calldataelement = new Object();
    calldataelement.parameterid = 4035;
    calldataelement.value = productobject.getAttribute("data-product_categories");
    calldata.push(calldataelement);
    calldataelement = new Object();
    calldataelement.parameterid = 4041;
    calldataelement.value = productobject.getAttribute("data-email");
    calldata.push(calldataelement);
    jodoInit.SaveCustomerSessionData(calldata);
    jodoInit.showwidgetfromscript();
    jodoInit.showwidget_Chatfromscript();
            }
    resizeDownForJodo();//15-May-2019
        }

    function onJodoVideoClicked (productobject) {
            var calldata = [];
    var calldataelement = { };
    if (jodoinitdone === true) {
        calldataelement = new Object();
    calldataelement.parameterid = 4030;
    calldataelement.value = productobject.getAttribute("data-product_url");
    calldata.push(calldataelement);

    calldataelement = new Object();
    calldataelement.parameterid = 4031;
    calldataelement.value = productobject.getAttribute("data-product_name");
    calldata.push(calldataelement);
    calldataelement = new Object();
    calldataelement.parameterid = 4034;
    calldataelement.value = productobject.getAttribute("data-product_price");
    calldata.push(calldataelement);
    calldataelement = new Object();
    calldataelement.parameterid = 4033;
    calldataelement.value = productobject.getAttribute("data-product_id");
    calldata.push(calldataelement);
    calldataelement = new Object();
    calldataelement.parameterid = 4035;
    calldataelement.value = productobject.getAttribute("data-product_categories");
    calldata.push(calldataelement);
    calldataelement = new Object();
    calldataelement.parameterid = 4041;
    calldataelement.value = productobject.getAttribute("data-email");
    calldata.push(calldataelement);
    jodoInit.SaveCustomerSessionData(calldata);
    jodoInit.showwidgetfromscript();
    jodoInit.showwidget_Videofromscript();
            }
    resizeDownForJodo();//15-May-2019
}

    function jodoWidgetInitialized() {
        jodoinitdone = true;
    }
    /*15-May-2019*/
    var jodo_browser_size = window.matchMedia("(min-width: 900px)");
    function resizeDownForJodo() {

            if(jodo_browser_size.matches){
        document.getElementById("widget_main_div").style.width = "28%";
    document.getElementById("widget_main_div").style.display="block";
    document.getElementById("widget_close_icon").style.display="block";
    document.getElementById("widget_chat_icon").style.display="none";
    document.body.classList.add("resize-for-jodo");
    document.getElementById("primary-nav").classList.add("container-new-jodo-nav");
    var el = document.querySelectorAll(".container");
    for (var i=0;i<el.length; i++) {
        el[i].className = "container-new-jodo";
            }


            }
    document.getElementById("widget_close_icon").addEventListener("click", resizeUpForJodo);
    document.getElementById("widget_chat_icon").addEventListener("click", resizeDownForJodo);

    document.getElementById("widget_close_icon").style.display="block";
    document.getElementById("widget_chat_icon").style.display="none";
    document.getElementById("widget_main_div").style.display="block";
        }
    function resizeUpForJodo(){
            if(jodo_browser_size.matches){
        document.body.classList.remove("resize-for-jodo");
    document.getElementById("primary-nav").className="navbar navbar-default";
    document.getElementById("primary-nav").classList.remove("container-new-jodo-nav");
    var el = document.querySelectorAll(".container");
    for (var i=0;i<el.length; i++) {
        el[i].className = "container-new-jodo";
                }
            }
    document.getElementById("widget_chat_icon").style.display="none";
        }
/*15-May-2019*/
</script>
Script function usage to pass the widget parameters:
onclick=”onJodoVideoClicked(this)”
Sample Button click events code and mapping to function: Chat/ Voice/ Video calls:
					<a class=" btn btn-default quick-view ion-android-call jodo-buttons-hide" data-toggle="tooltip" title="Click to Jodo Call" href="#" onclick="onJodoCallClicked(this)" data-product_name="Pigeon Pressure Cooker (Aluminium)" data-product_price="1649" data-product_id="371" data-product_categories="Electronics, Kitchen appliance"  data-user_id=""></a>

<a class=" btn btn-default quick-view ion-ios-videocam jodo-buttons-hide" data-toggle="tooltip" title="Click to Jodo Video Call" href="#" onclick="onJodoVideoClicked(this)" data-product_name="Pigeon Pressure Cooker (Aluminium)" data-product_price="1649" data-product_id="371" data-product_categories="Electronics, Kitchen appliance"  data-user_id=""></a>

<a class=" btn btn-default quick-view ion-android-chat jodo-buttons-hide" data-toggle="tooltip" title="Click to Jodo Chat" href="#" onclick="onJodoChatClicked(this)" data-product_name="Pigeon Pressure Cooker (Aluminium)" data-product_price="1649" data-product_id="371" data-product_categories="Electronics, Kitchen appliance"  data-user_id=""></a>
Frequently Asked Questions
You could download the app from jodoworld.com web site. The app is avaiable for iOS, android and PC.
Make sure that your browser javascript is enabled and Jodo widget is configured for the domain name.
Check the spam mailbox for the activation link. After successful activation procees with creation of default service and users.
We use ChatBox/CallBox code for WordPress where the menu will be displayed in the bottom right corner for every page on the site. The "Button Code" is used to have a chat/call button on a single page. You need to cut and paste the code into your html file manually.
If your jodo app in your mobile is not started, customer will receive callback option to submit so that after loggin agent can contact back on voice or email as the details shared in callback form.
You could install into multiple devices (android mobile, android tablet, PC) but you can login on single device at a time or you can use different user account for each individual device.
You could send individual image or photo by clicking on upload sign during the chat. You could also combine multiple photos/images by clicking the upload and select icon and add images/photo into the active chat session to send.
With same session if the voice call is dropped due to network failure and customer is still active on chat, in this scenario agent can send call / video request to restart the session.
Screenshots
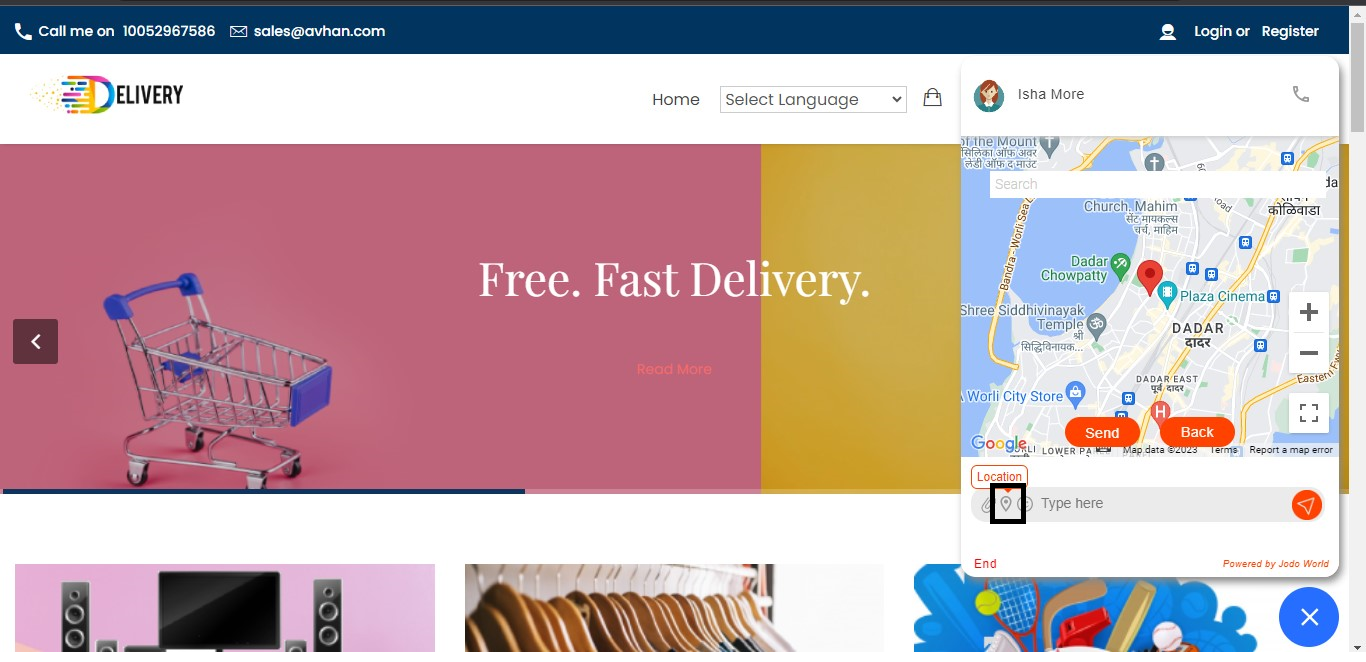
1. Chat/Call menu displayed in bottom, right corner. Creating notepad with rich contents and sharing with visitors/customers during chat session.
2. Co-browsing web, making annotation directly on the screen to express your intention clearly during voice call.
3. Co-viewing documents, making annotation, highlighting important sections, words… during call session.
4. Translate words into different languages to your international partners, customers.
5. Receive chat/call from customers with multiple devices: ipad, iphone, android or PC…and bring customer service with you wherever you go.